One Light, One Sun: Creating a Tone-on-Tone Senior Portrait With the FJ400
One of the things I’ve learned over the years is that creating stronger portraits isn’t always about adding more gear. Sometimes it’s about learning to recognize what’s already in front of you.
I photographed this image of Phillip, Class of 2025, during his senior session in Southwest Louisiana on February 24, 2025. We made this photograph at 5:02 PM, when the sun was getting lower in the sky but there was still plenty of ambient light to work with.
What caught my attention wasn’t necessarily the location by itself.
It was the color.
Phillip was wearing a muted blue hoodie, and as we were walking I noticed how well the blue in his clothing related to the blue sky and water around him.
That gave me an opportunity to create a tone-on-tone portrait with a pretty simple lighting setup: one Westcott FJ400 and the sun.
But before we talk about the flash, let’s talk about seeing the photograph in the first place.
Learning to See Color Before You Light It
One of the photographers who helped train my eye for this is Lindsay Adler. Through her education, I learned to pay more attention to patterns, colors and relationships that already exist around us.
Lindsay Adler Photography Education
That has changed the way I approach locations.
Instead of only asking:
Where is a good place to put my subject?
I’m also looking at what my subject is wearing and asking:
What in this environment already works with them?
In this case, it was blue against blue.
Phillip’s blue hoodie, the blue sky and even some of the cooler tones in the water were already giving me a harmonious palette.
This is where understanding color theory can make a big difference in your portrait work.
Color Harmony Doesn’t Always Need Contrast
We hear a lot about complementary colors in photography—blue and orange, red and green, yellow and purple.
Those combinations work because they create contrast.
But contrast isn’t the only way to create color harmony.
Working with analogous colors—colors that sit near each other on the color wheel—or even different tones of the same color family can create a portrait that feels cohesive without the colors fighting for attention.
In this situation, the blues were already there. I didn’t have to manufacture the palette. I just had to recognize it.
That’s something I try to remind photographers when I teach: nature is constantly giving us color combinations. We have to train ourselves to notice them.

Settings — Canon EOS R5, RF 28–70mm F2 L at 41 mm, f/5.0, 1/1600 sec. ISO 100
The Available Light Wasn’t Bad
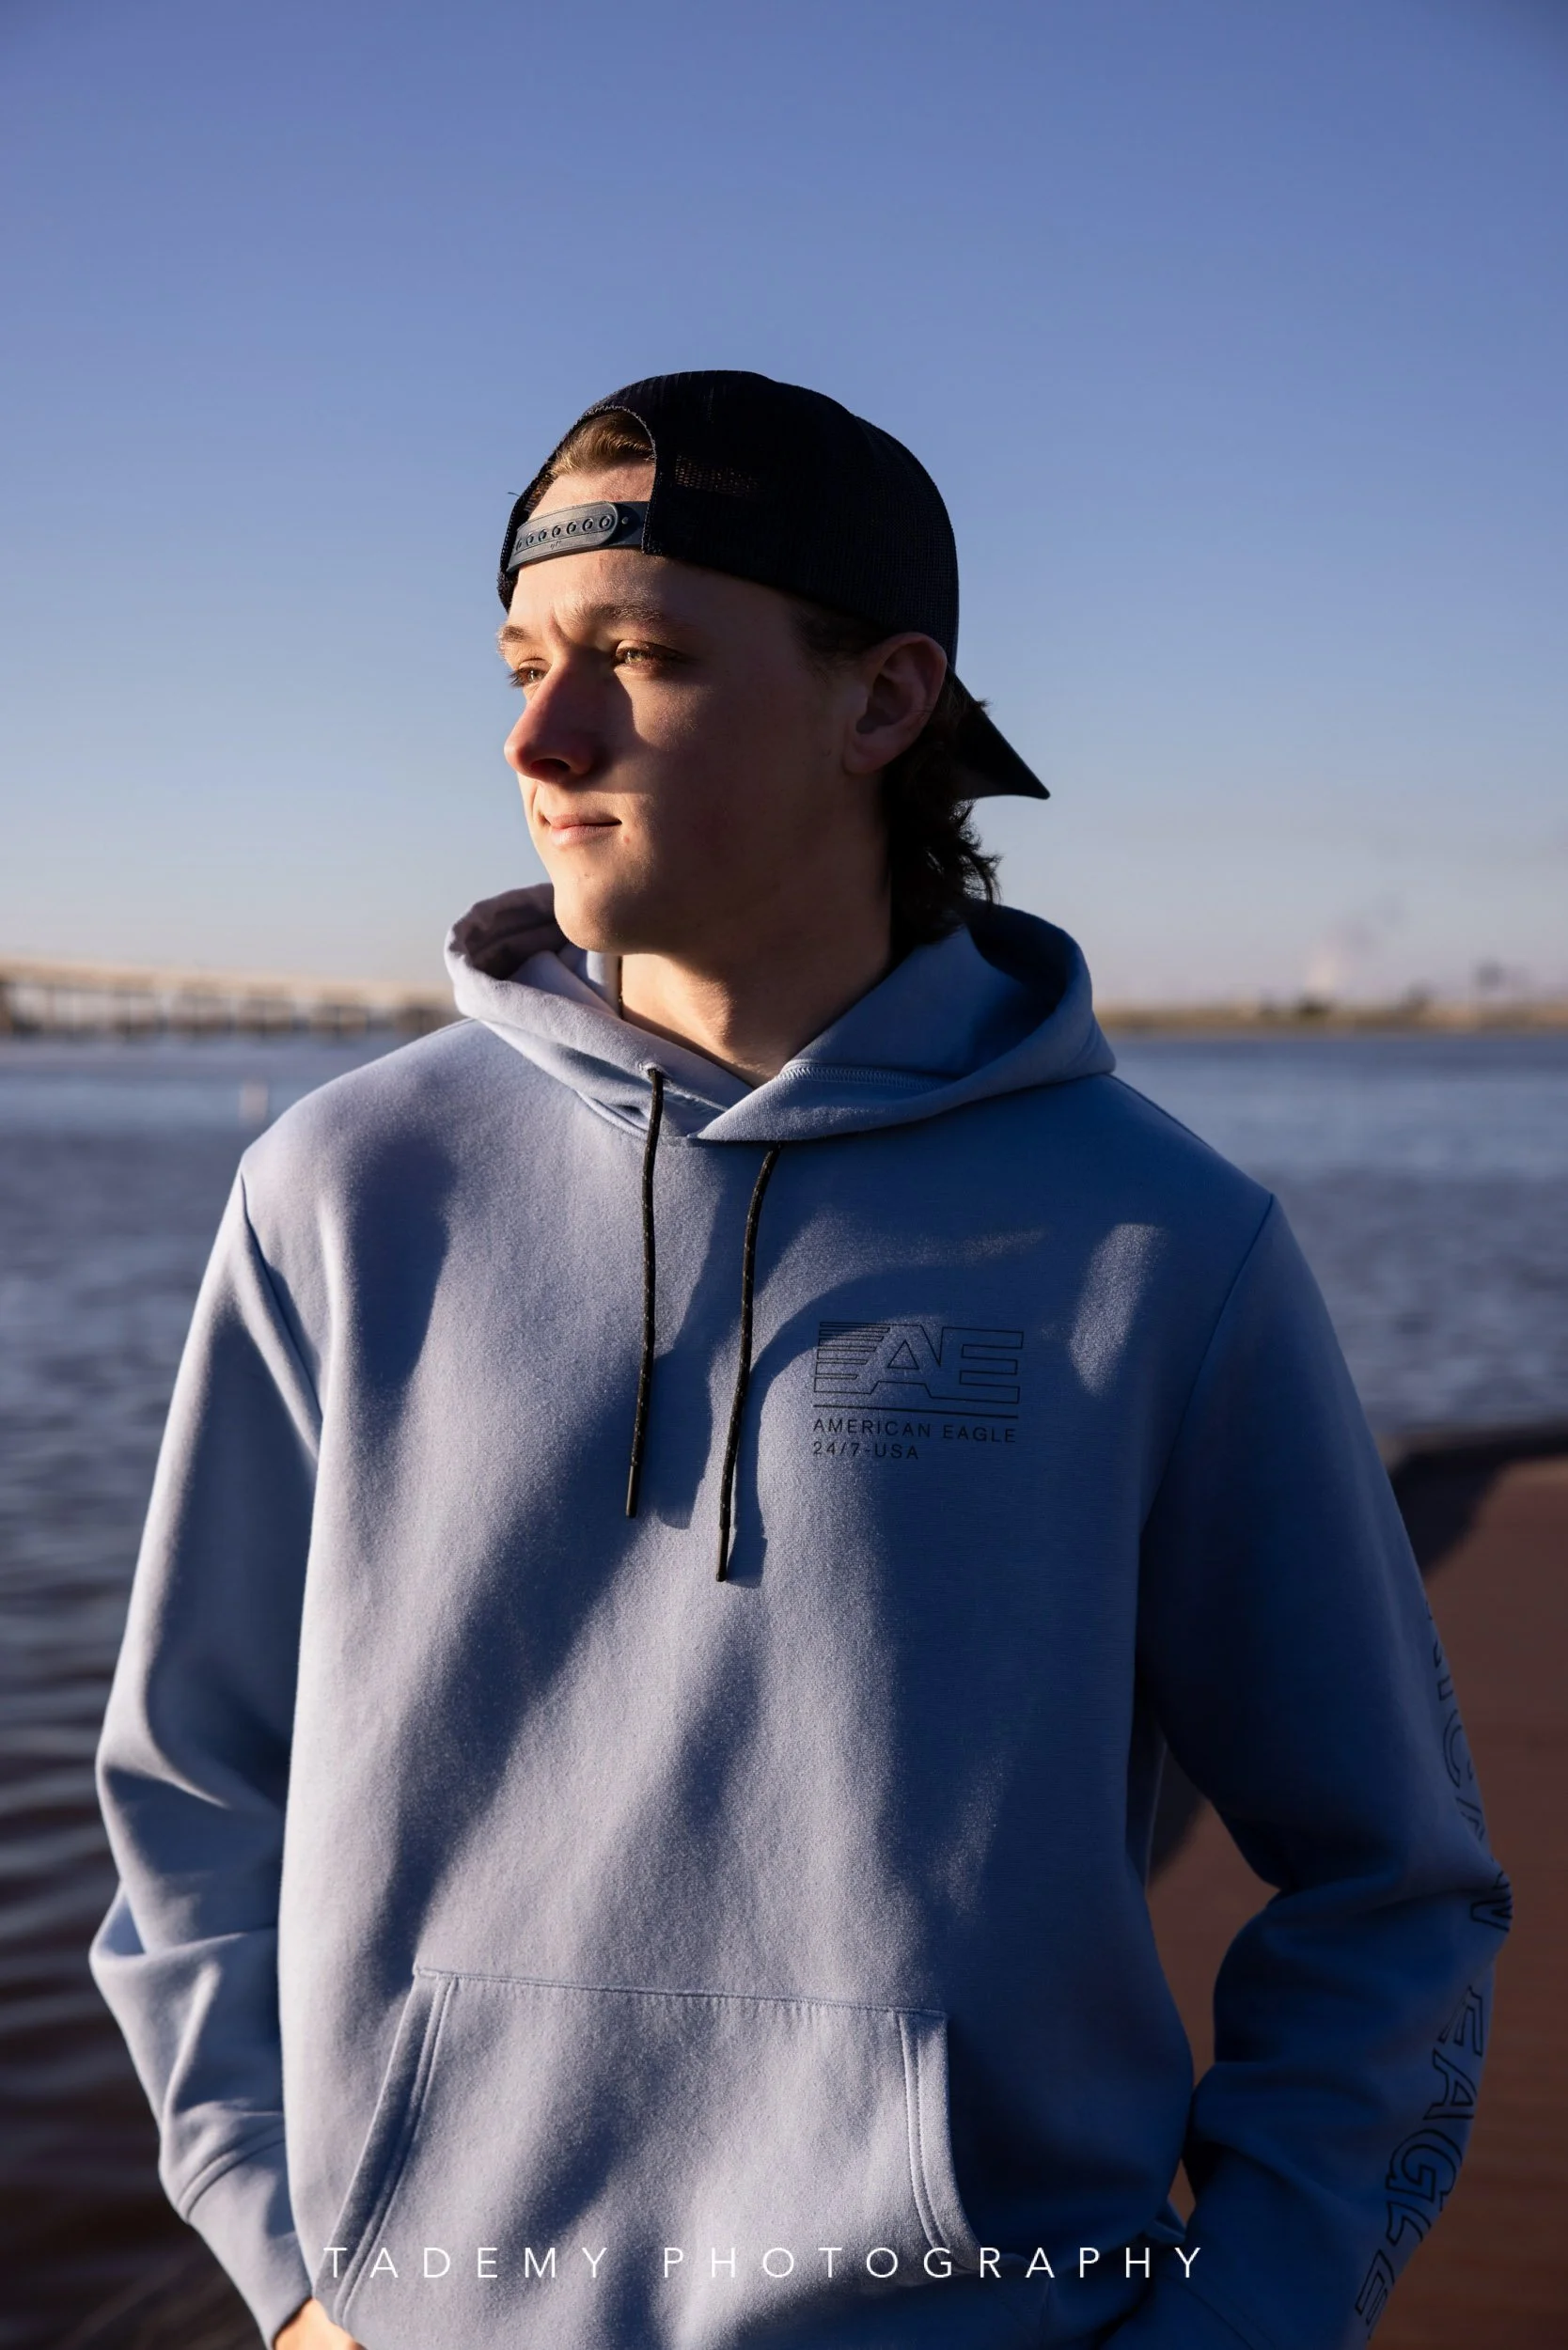
Available-light reference — Canon EOS R5, RF 28–70mm F2 L at 54mm, f/4.5, 1/800 sec.
Before bringing in the FJ400, I also photographed Phillip using the available light.
And there’s nothing wrong with this photograph.
In fact, I think that’s an important part of this lesson.
Using flash isn’t always about fixing bad light. Sometimes it’s about gaining more control over good light.
In the available-light photograph, the sun is doing all of the work.
Phillip is lit. The blue in his hoodie looks good. The environment looks good. We’re already starting to see the color relationship between his clothing, the water and the sky.
But there’s one limitation:
I’m accepting the relationship between Phillip and the background that the natural light is giving me.
For the next photograph, I wanted more control.
And that’s where off-camera flash becomes powerful.
Start With the Background, Not the Flash
For the final portrait, I was using my Canon EOS R5 with the RF 28–70mm F2 L.
My settings were:
ISO 100
31mm
f/3.5
1/1600 sec
The most important part of that exposure is probably the 1/1600-second shutter speed.
I didn't start by exposing Phillip.
I exposed for the sky first.
I adjusted my ambient exposure until the sky had the density and color I wanted. I wanted enough blue in that background for it to visually relate to Phillip’s hoodie.
That faster shutter speed helped bring the ambient exposure down.
But now I had created another problem.
Phillip was darker than I wanted for the finished portrait.
That’s where the FJ400 came in.
This is one of the biggest concepts I want newer photographers to understand about off-camera flash:
I’m not necessarily adding flash because there isn’t enough light.
Sometimes I’m adding flash because I don’t want the available light to determine both my subject exposure and my background exposure.
Flash allows me to separate those decisions.
Final exposure: ISO 100, f/3.5, 1/1600 sec at 31mm.
Think About It as Three Separate Jobs
This is probably the simplest way I can explain what I was doing:
Camera exposure = environment.
FJ400 = Phillip.
Sun = rim/accent light.
Once I started thinking about outdoor flash this way, balancing flash and ambient light became much easier.
Instead of asking one exposure to do everything, I’m deciding what I want each source of light to accomplish.
Why I Used High-Speed Sync
At 1/1600 sec, I was well beyond my camera’s normal flash-sync speed, so the FJ400 was operating in High-Speed Sync (HSS).
HSS allowed me to use that faster shutter speed to control the ambient light while still adding flash to Phillip.
Once I had my sky where I wanted it, I brought in one Westcott FJ400 with a Rapid Box Switch Octa-S.
The FJ400 was operating in TTL, and for this frame I was at approximately +1.3 stops of flash exposure compensation.
The light was positioned camera right, just outside of my composition and above Phillip’s head.
Its job was simple:
Fill the shadows and bring Phillip back to the exposure I wanted after I had intentionally exposed for the sky.
I wasn’t trying to make the photograph scream, “Look at my flash!”
I wanted the artificial light to blend with the existing light.
Westcott Rapid Box Switch Octa-S — affiliate link
Westcott FJ 400 original - https://www.fjwestcott.com/products/fj400-ii-touchscreen-400ws-strobe?sca_ref=5996150.KSuWkbNxiV
Westcott FJ 400 II - https://www.fjwestcott.com/products/fj400-ii-touchscreen-400ws-strobe?sca_ref=5996150.KSuWkbNxiV
Disclosure: The Westcott link above is an affiliate link, which means I may earn a commission if you purchase through it.
Available Light vs. Flash
Here’s where putting the two photographs together becomes useful.
Available Light
Canon EOS R5
RF 28–70mm F2 L
54mm
f/4.5
1/800 sec
One-Light Portrait
Canon EOS R5
RF 28–70mm F2 L
31mm
ISO 100
f/3.5
1/1600 sec
Westcott FJ400 in HSS
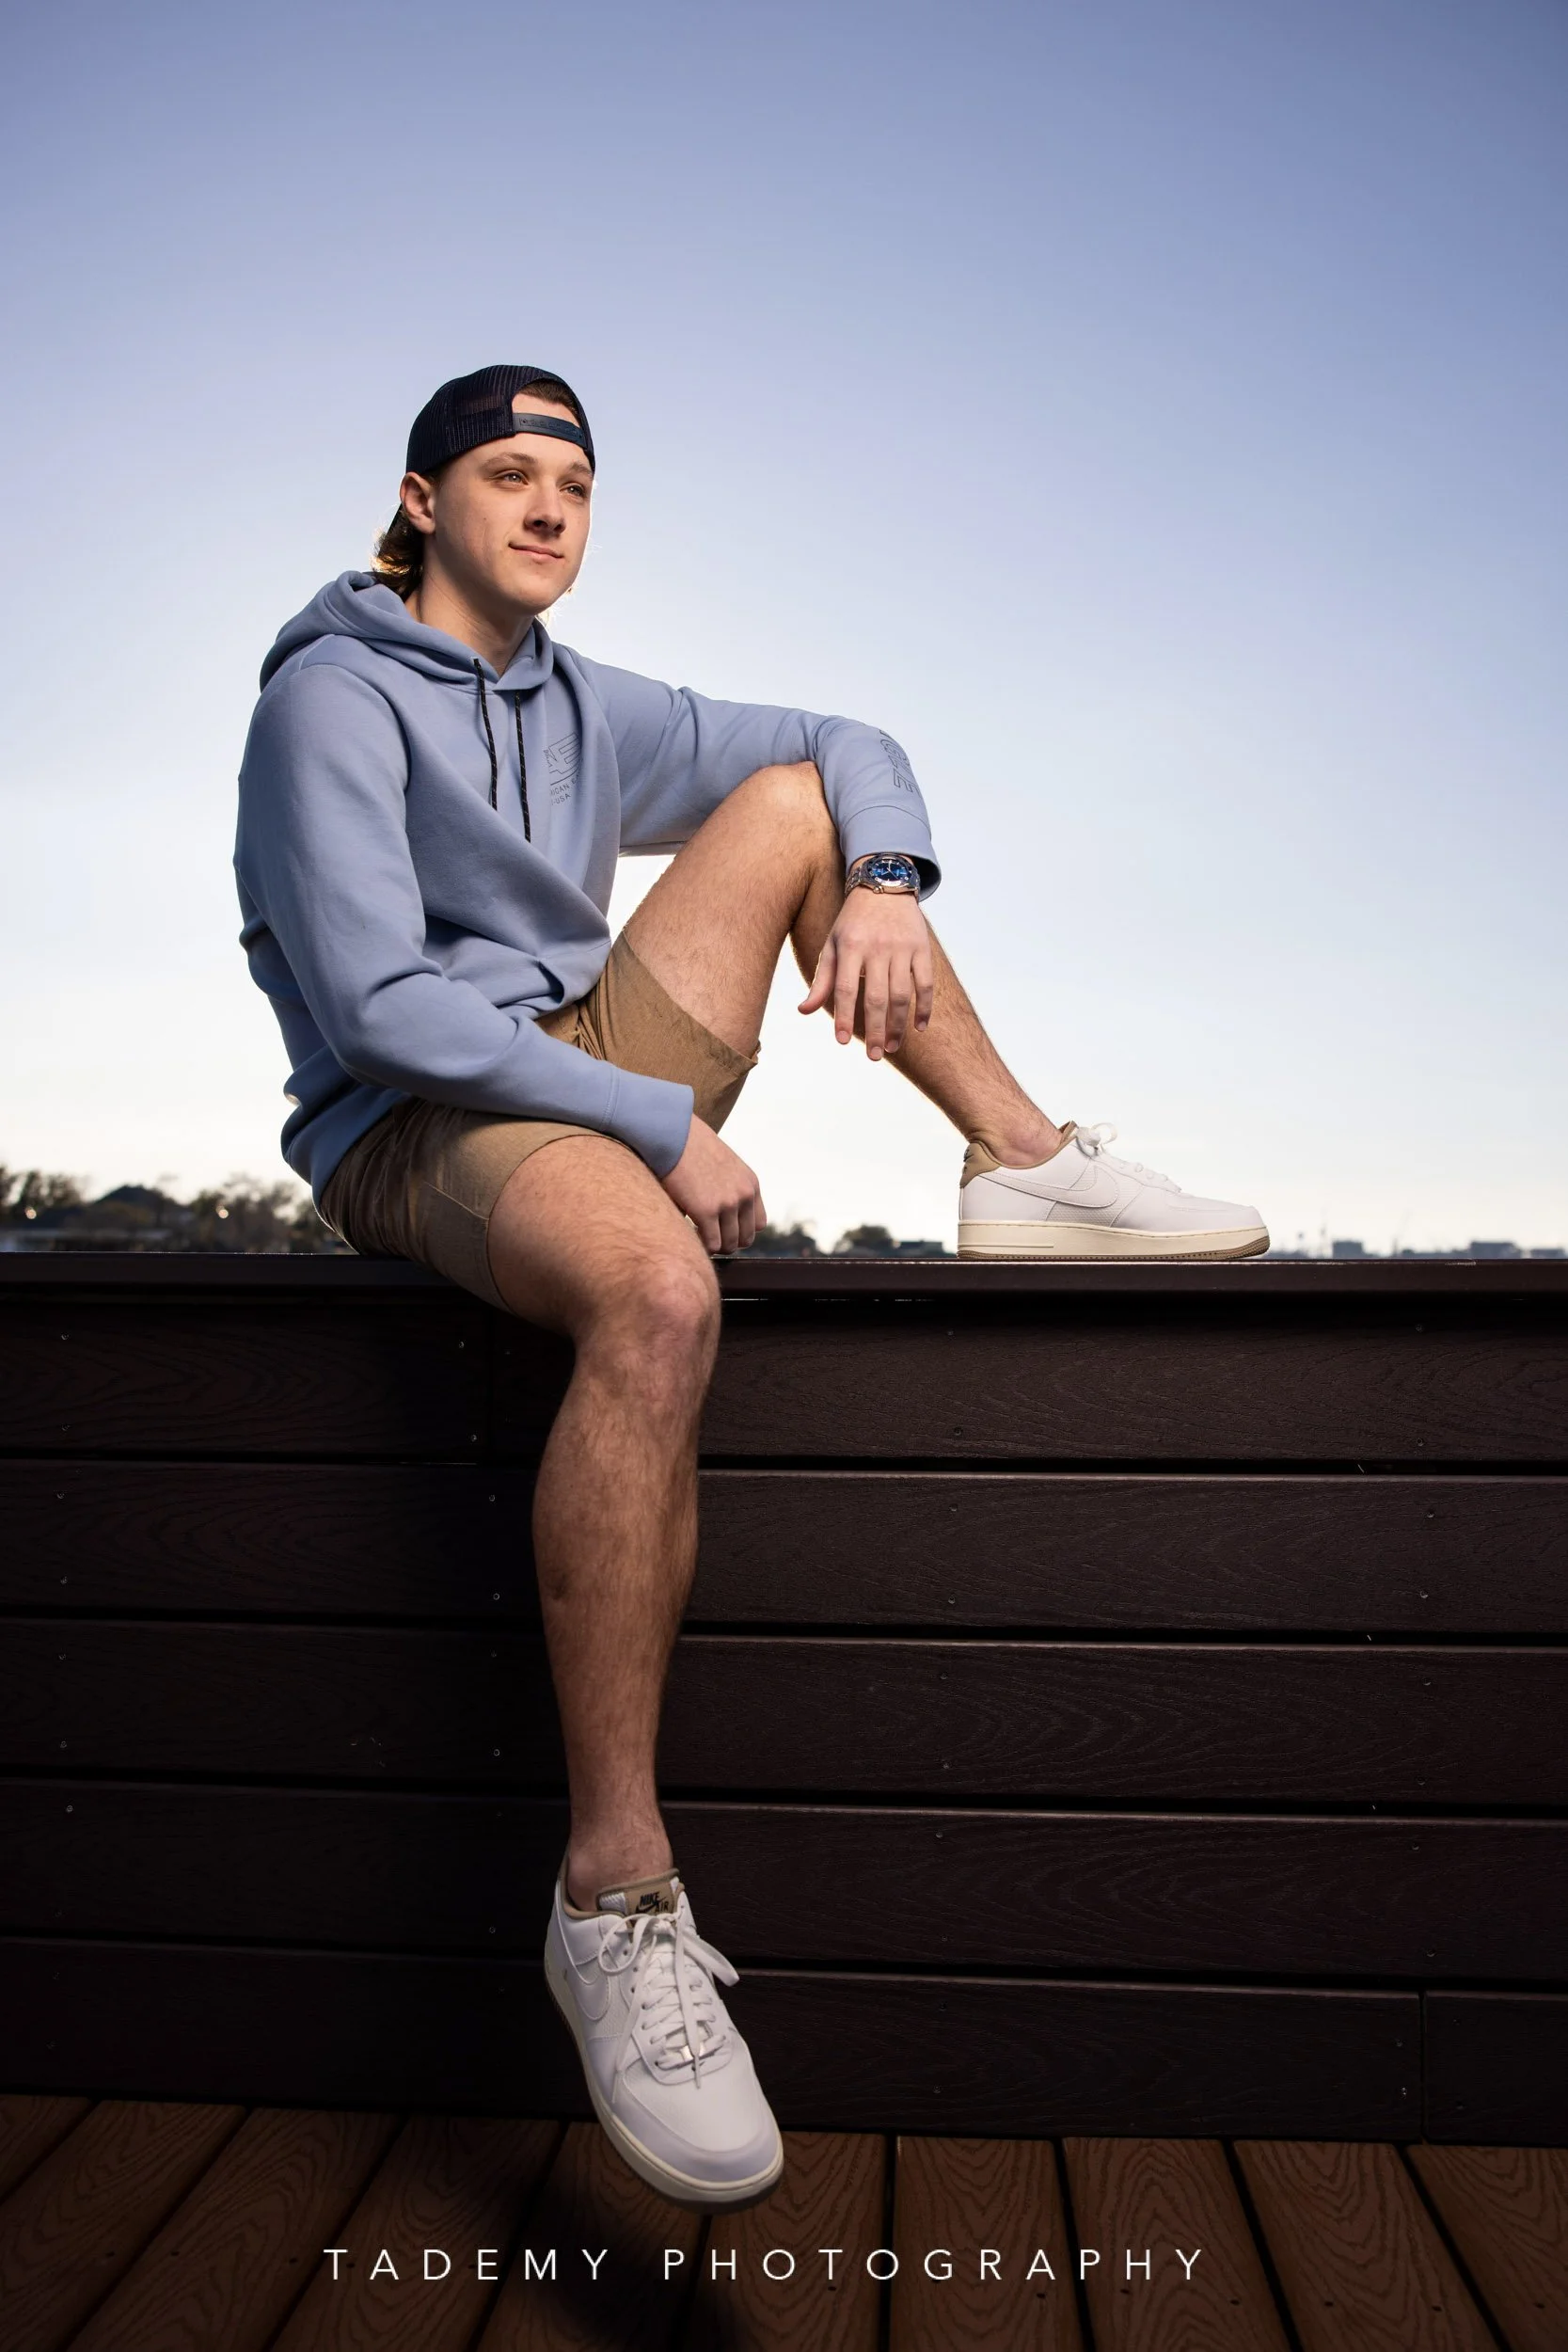
Natural light with strobe
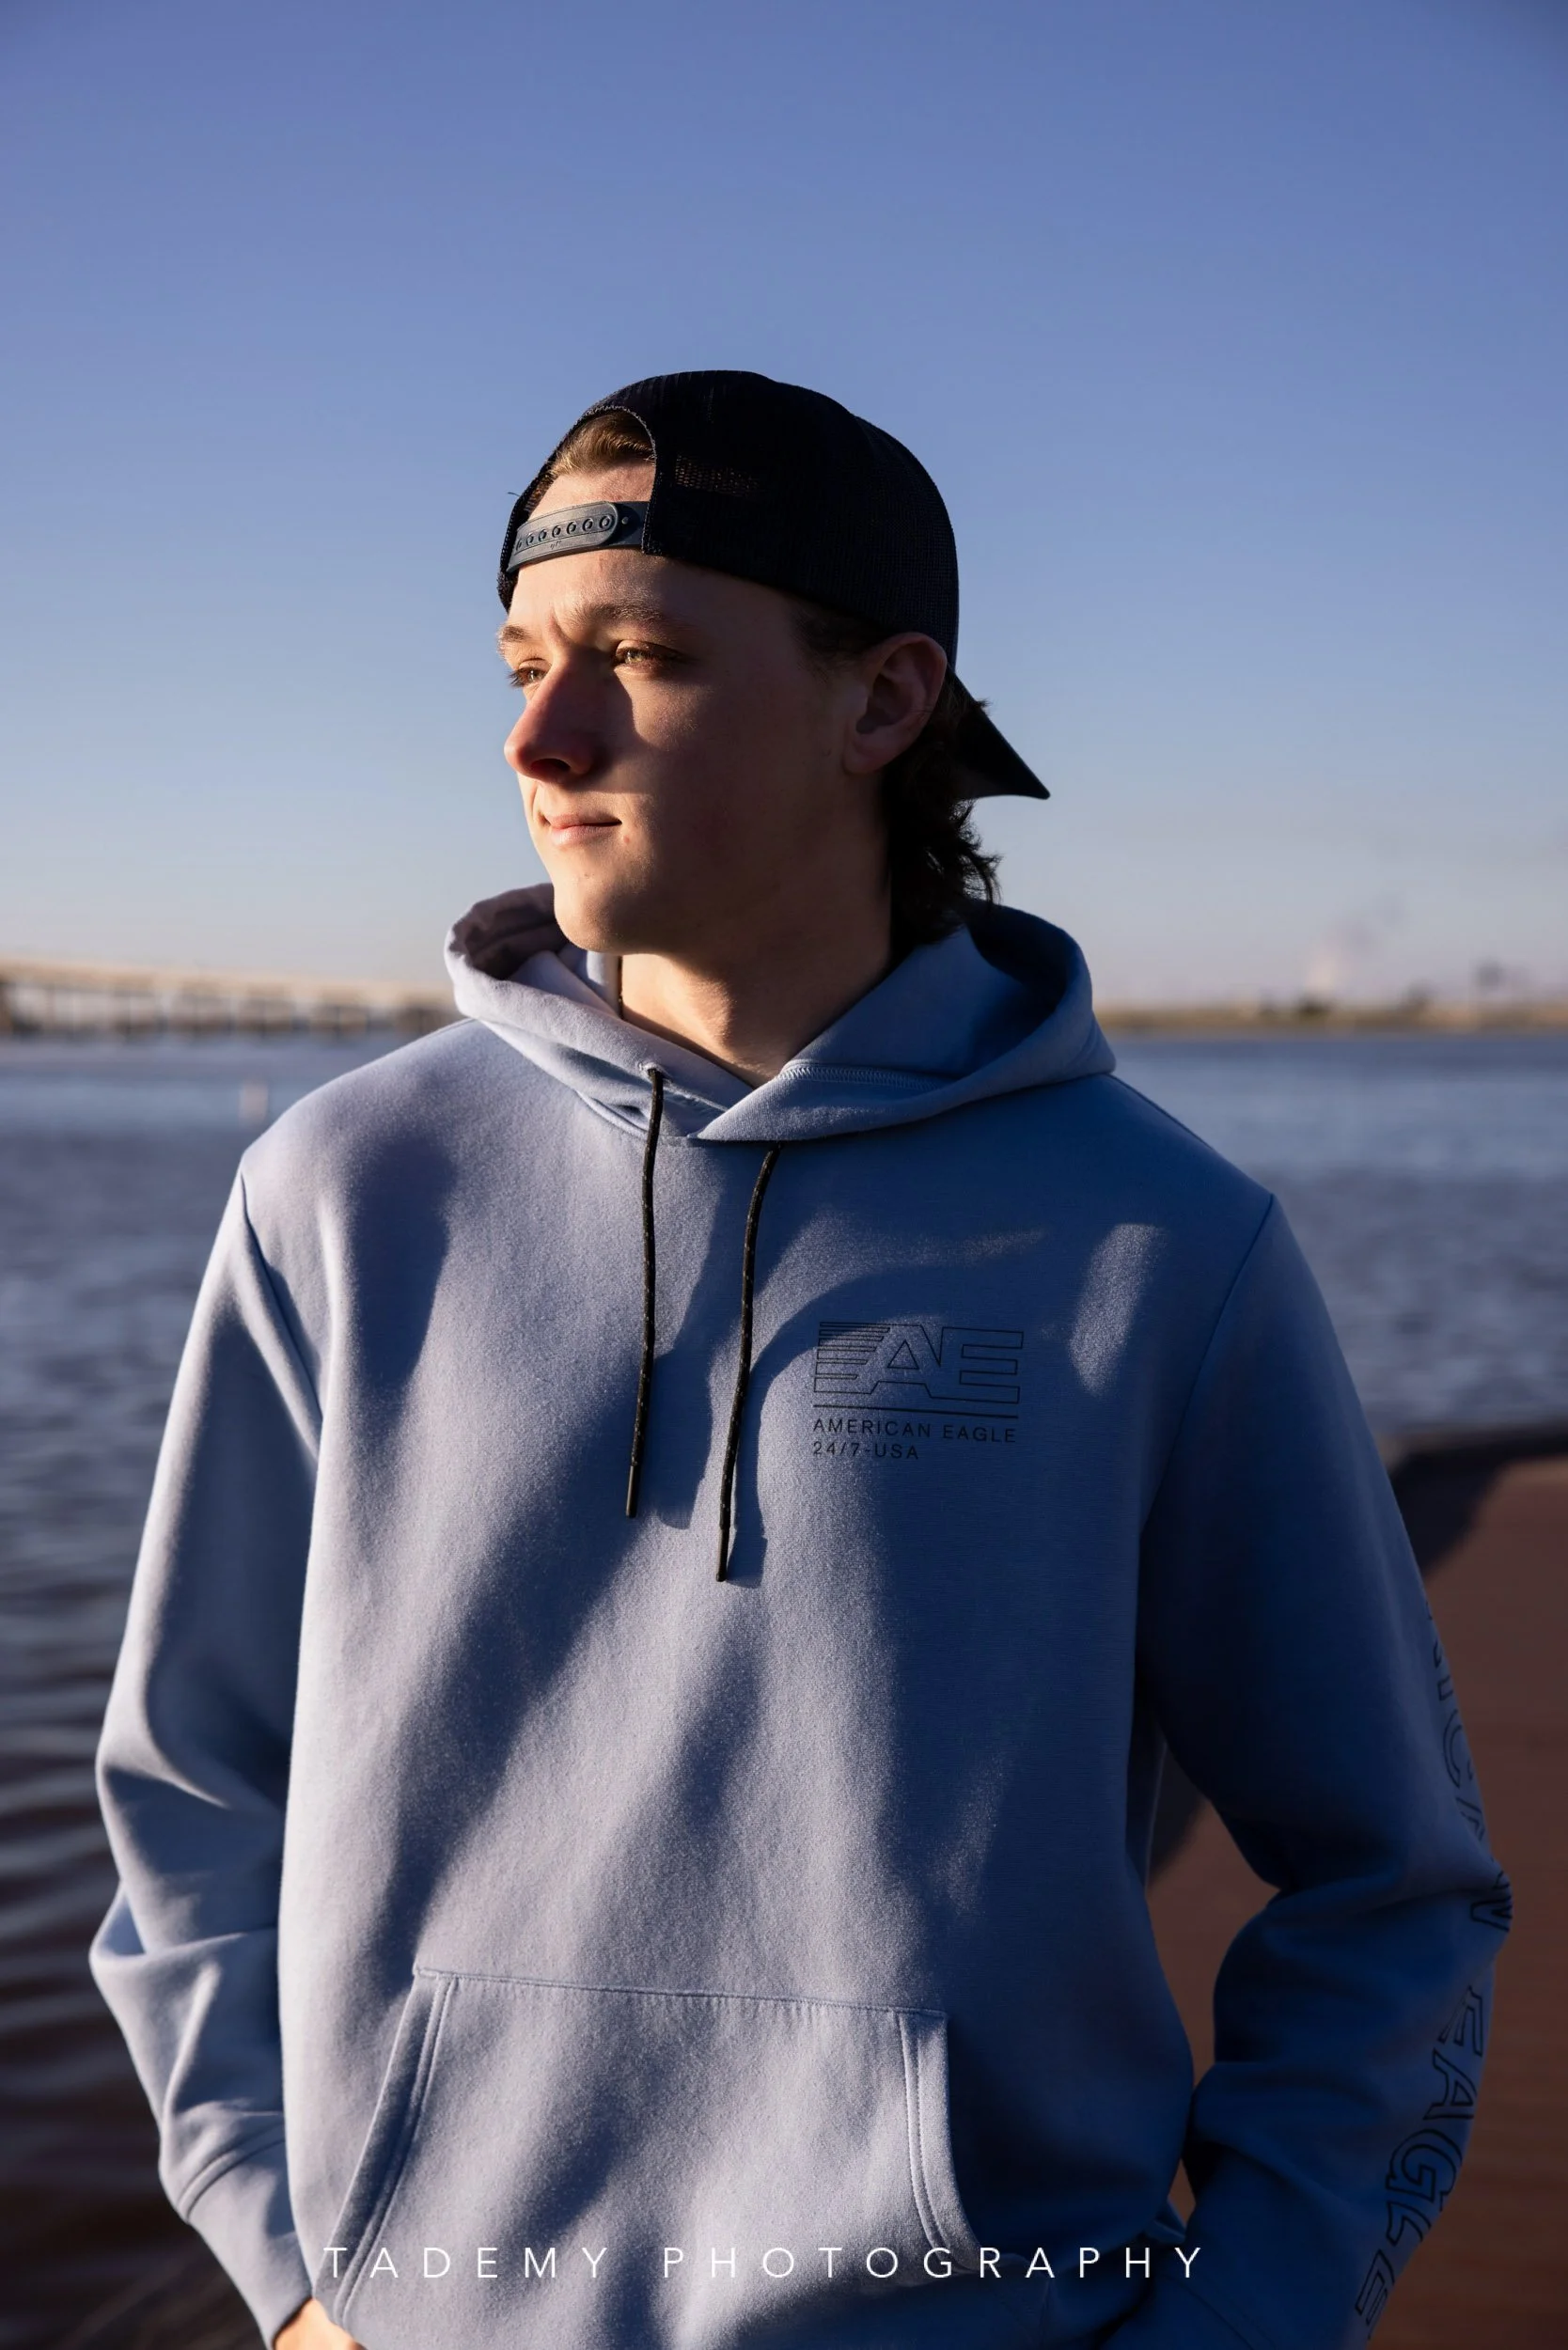
Natural light only
These aren’t intended to be identical before-and-after photographs. The focal length, composition and exposure changed.
Instead, look at them as two different ways I worked the same environment.
The available-light portrait shows what nature was already giving me.
The FJ400 portrait shows what happens when I take greater control over the relationship between my subject and the environment.
And that’s an important distinction.
The flash didn't create the color harmony. It gave me enough control to preserve and emphasize the color harmony I had already seen.
I Didn't Need a Second Flash
I could have added another FJ400 or FJ200 behind Phillip to create separation.
But I already had another light.
The sun.
I positioned Phillip so the natural sunlight could work as my rim/accent light while the FJ400 handled the front of him.
That essentially gave me a two-light look while only setting up one artificial light.
This is another thing I want photographers who are learning lighting to think about:
Before adding another light, look at what light nature is already giving you.
The sun can be your rim light.
A white wall can become fill.
An open doorway can become a giant soft light source.
The environment is full of light sources and reflective surfaces if you train yourself to recognize them.
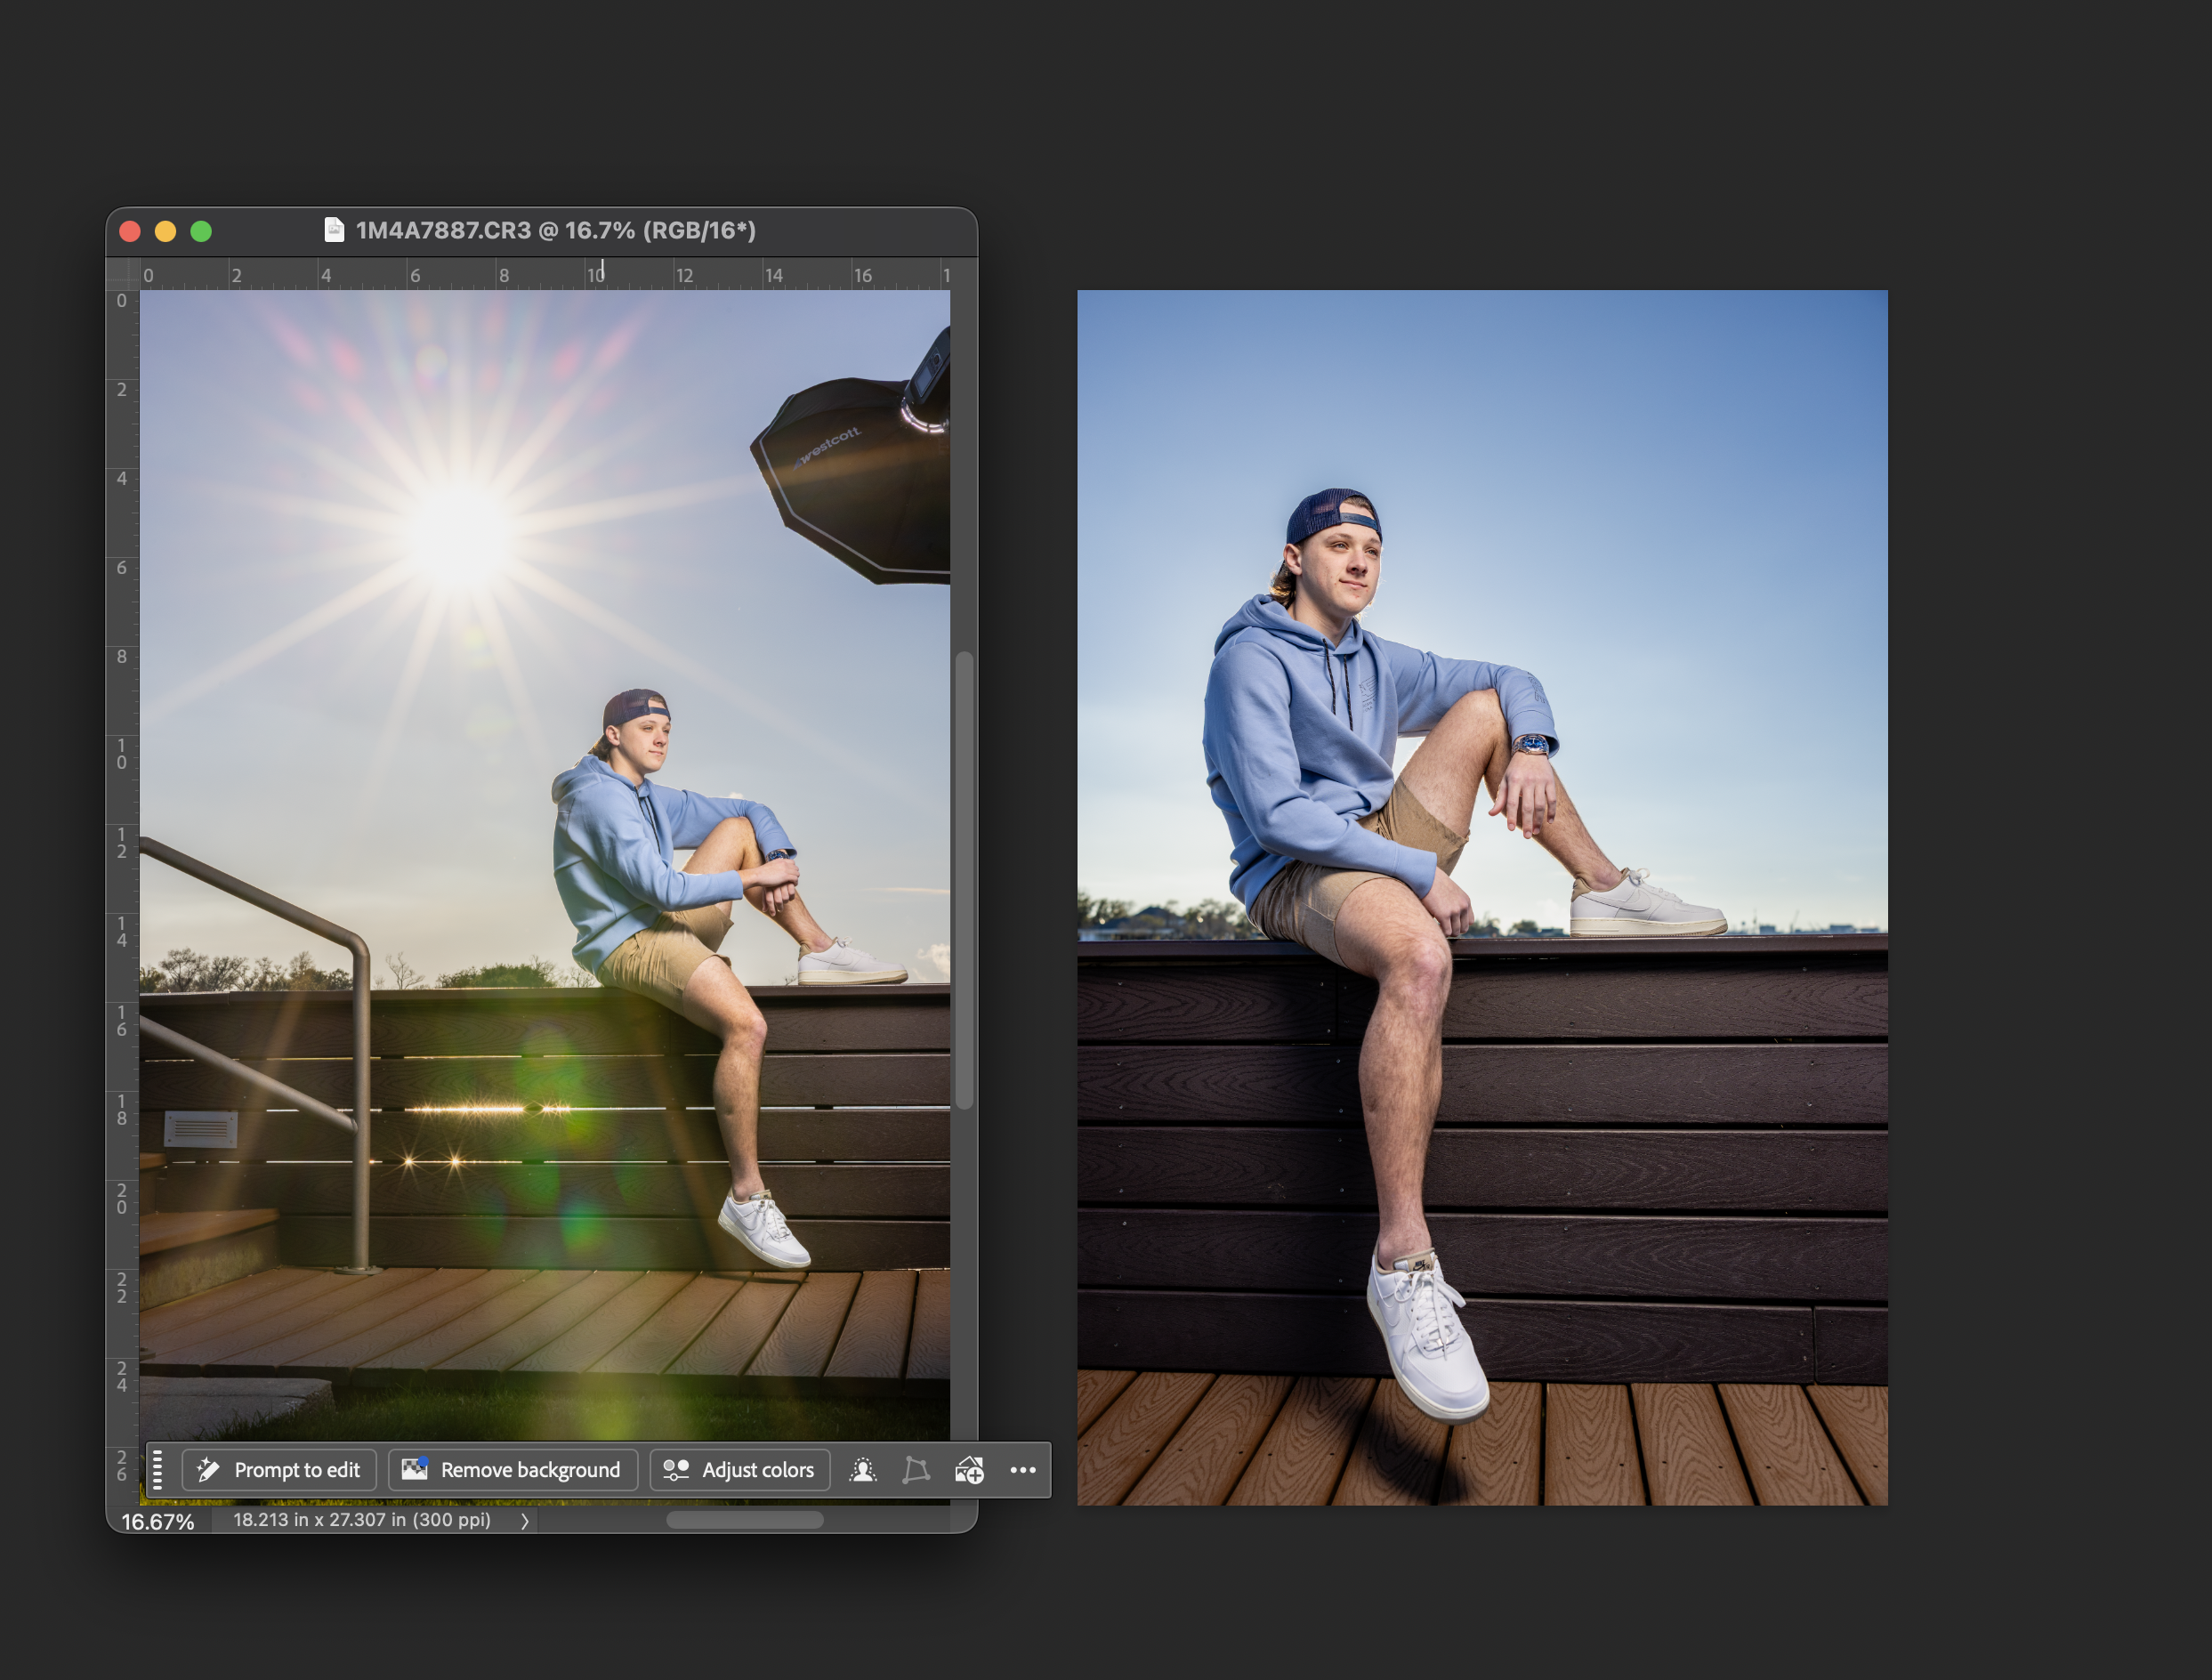
The pullback shows the setup: one FJ400 lighting Phillip from camera right while the sun provides the accent light from behind.
The Pullback Became a Happy Accident
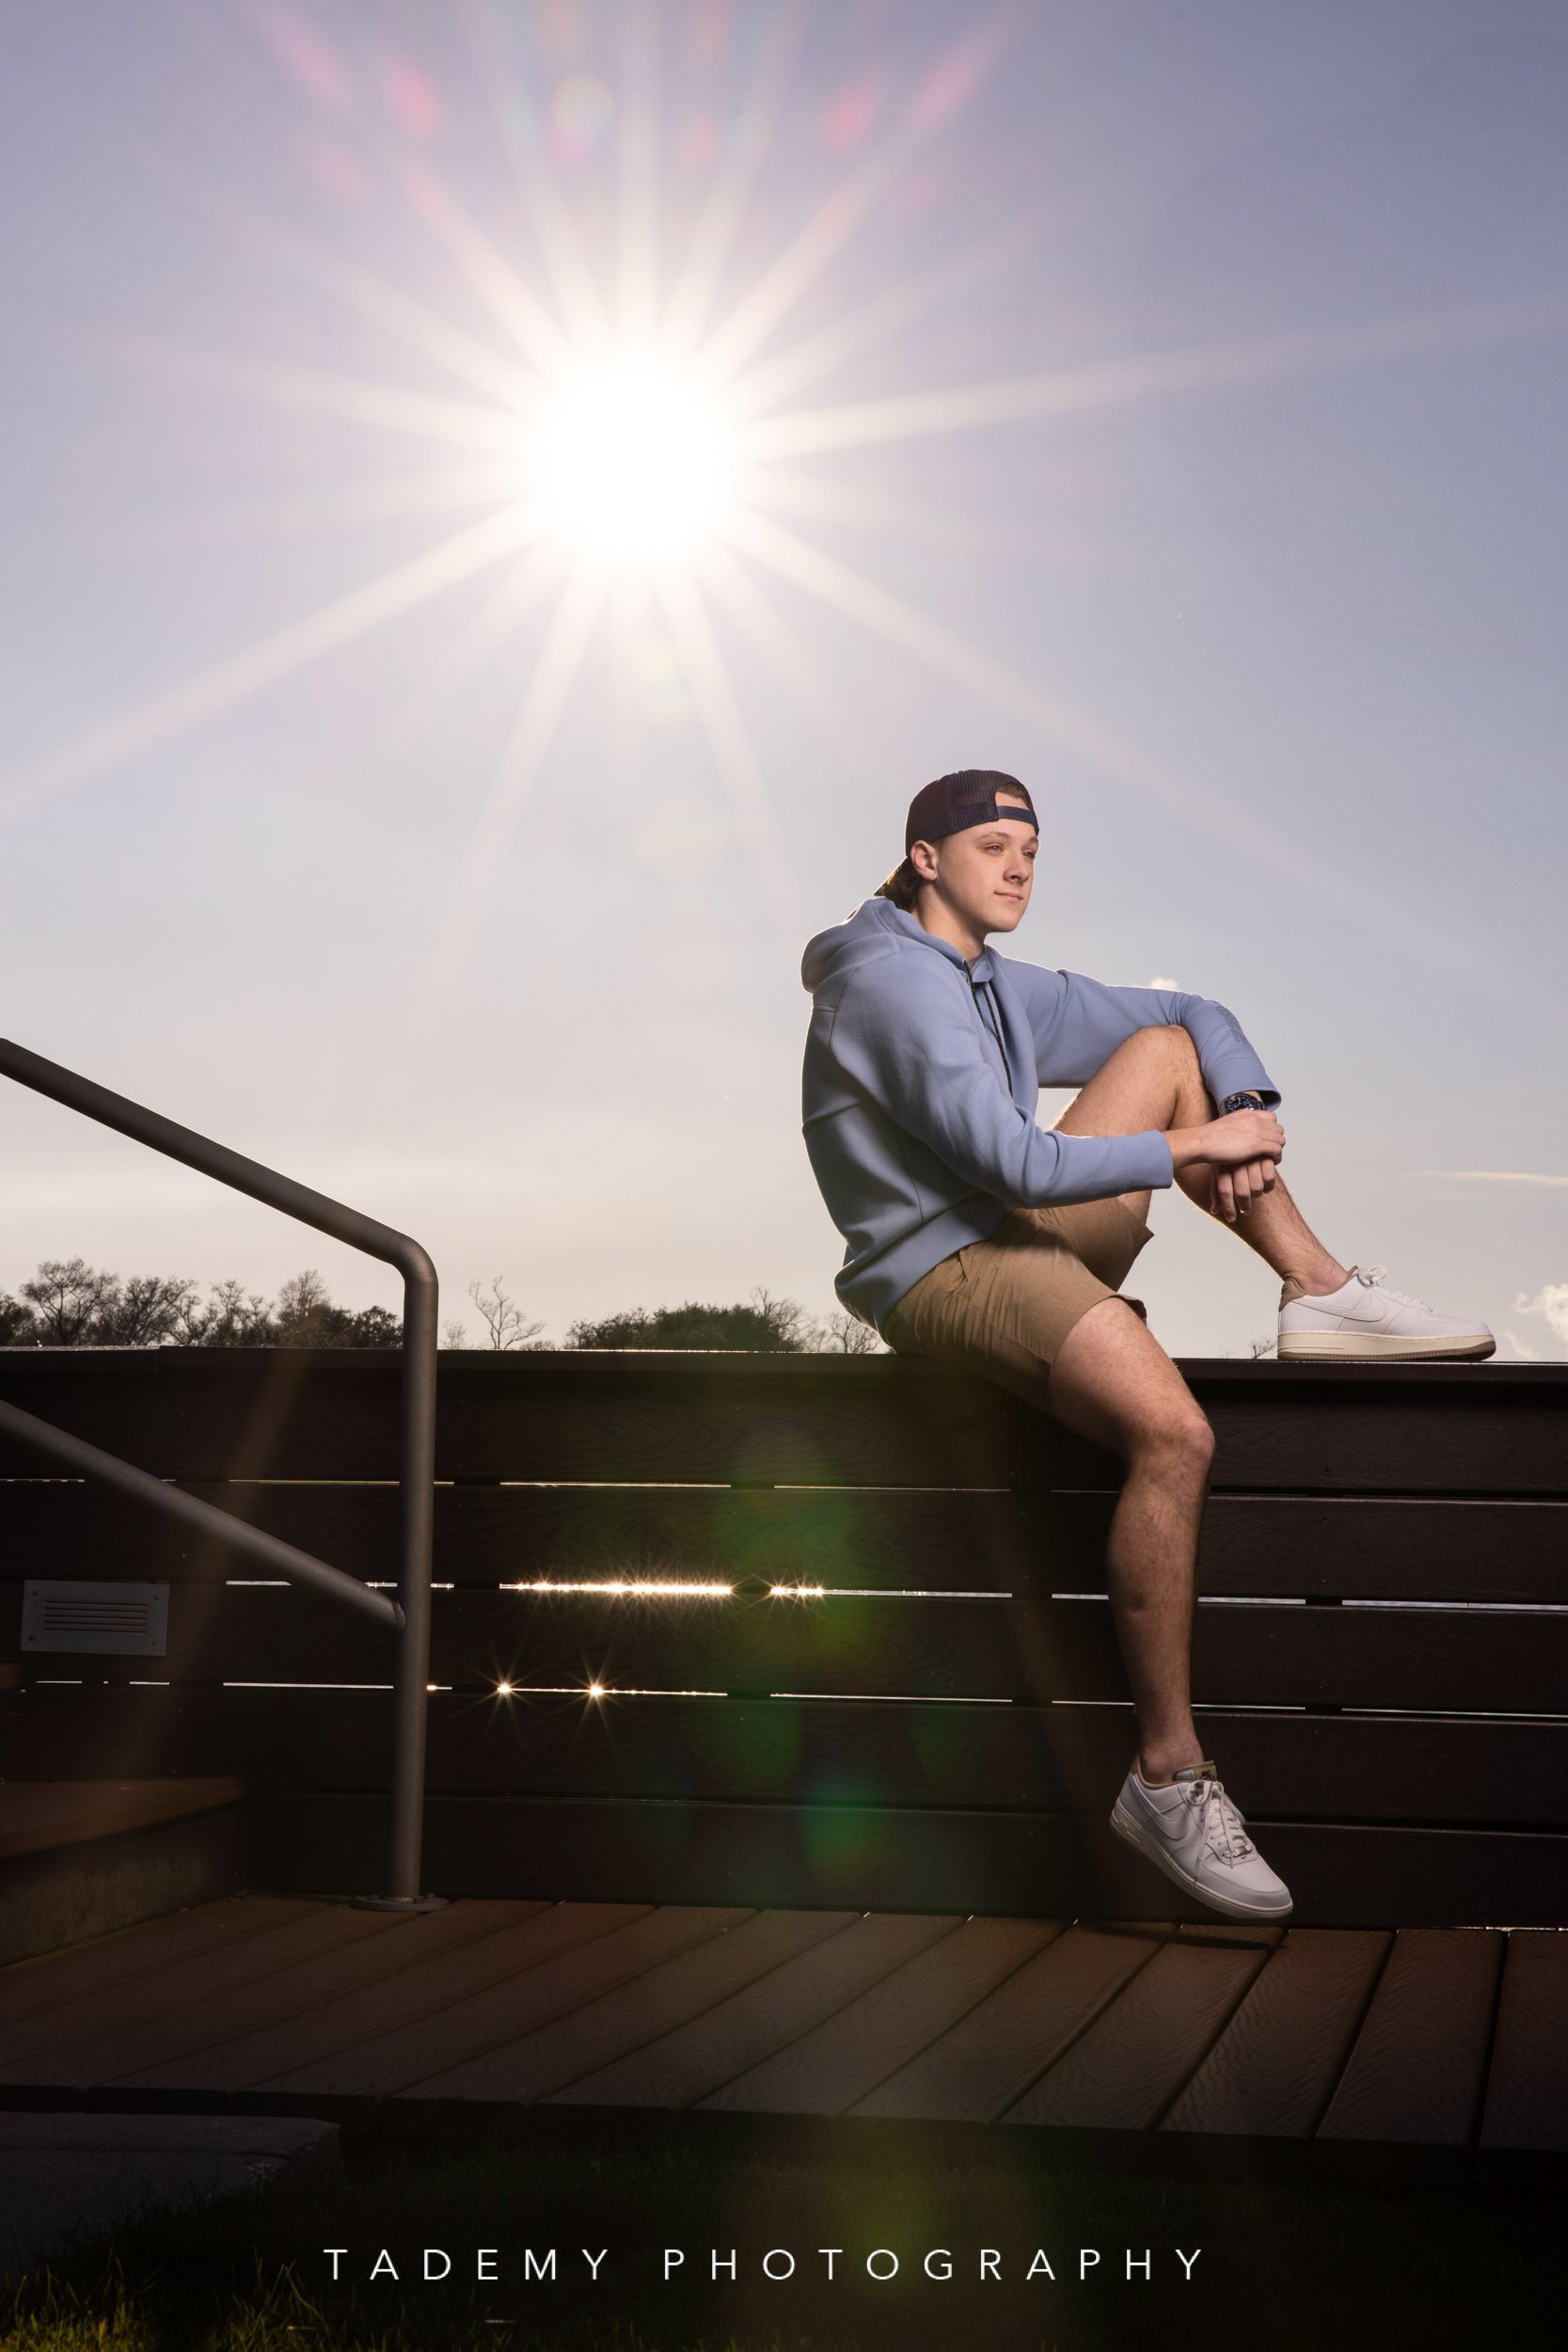
Pull Back shot with FJ 400 Removed
There’s actually another story behind that BTS photograph. Whenever I create something that I think I may want to teach later, I try to grab a wider frame showing the lighting setup. That’s what I was doing here. I intentionally pulled back far enough to show the FJ400 and modifier in the frame, with the sun coming directly toward the camera. Then I looked at the photograph. The starburst and flare from the sun gave the image an entirely different feeling. What started as an educational behind-the-scenes photograph suddenly had potential as another finished portrait. The modifier obviously wasn't supposed to be part of Phillip’s finished image, so I removed it in post-production. Now I had another creative photograph I could deliver to Phillip. That wasn’t necessarily planned. It was a happy accident that came from experimenting. And I think there’s a lesson in that too.
Get the photograph you know you need, but leave yourself room to play.
What I Actually Did in Photoshop
It would be easy to look at the finished photograph and assume I created all of that blue in post. I didn’t.
The color relationship existed when I made the photograph.
But I absolutely refined it in post-production. I photograph my senior sessions in RAW because I want the additional information and editing latitude when I need to recover highlights, open shadows or fine-tune color.
Here's what I actually did.
Global Adjustments
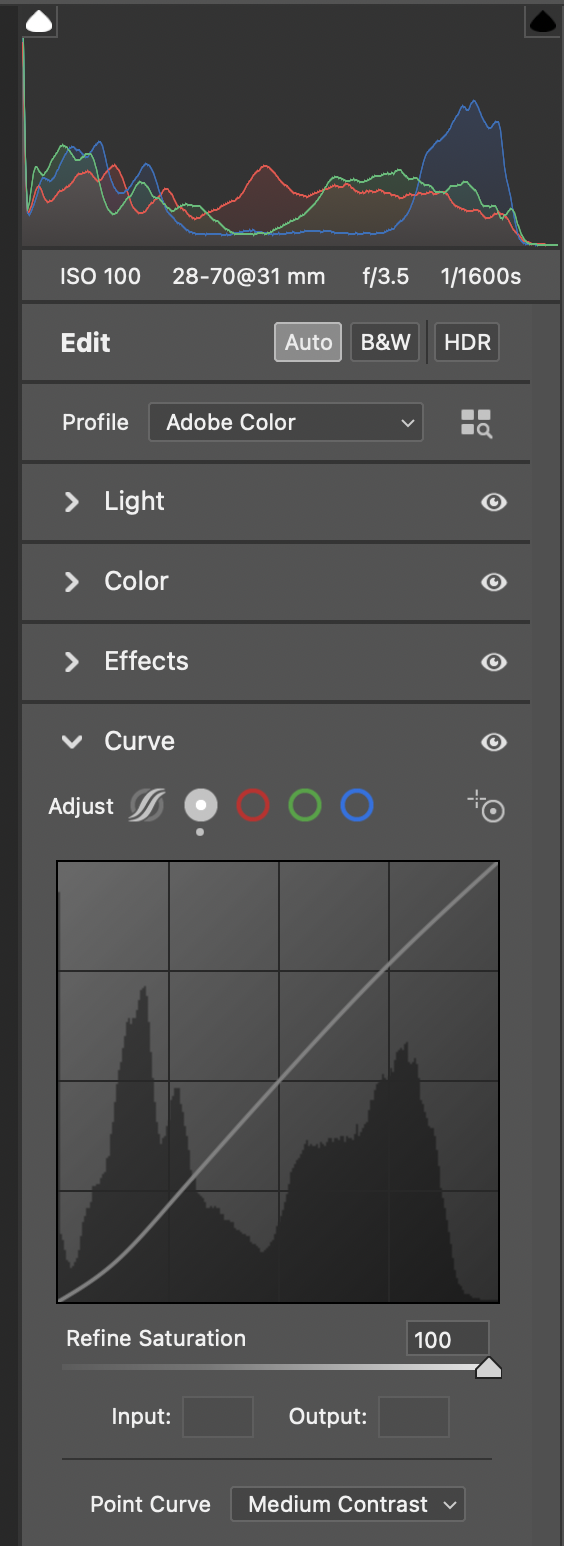
My primary Lightroom adjustments were:
Exposure: +0.44
Contrast: +6
Highlights: -79
Shadows: +67
Whites: +23
Blacks: -19
I also used Lightroom's Medium Contrast point curve.
For color:
White Balance: 5450K
Tint: +14
Vibrance: +14
Saturation: -2
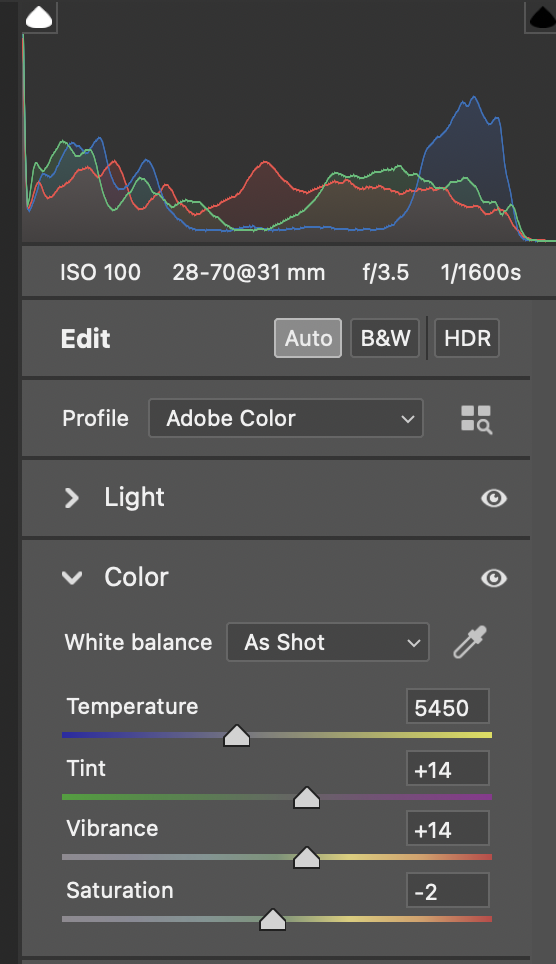
Screenshot from Post Production
Pay attention to those last two settings. My vibrance came up slightly, but my global saturation was actually -2.
I didn't just crank the saturation slider until everything turned blue. The foundation for the color was already there.
Editing the Subject Separately
I also created a mask for Phillip.
The exposure adjustment on the subject was only approximately:
+0.15 exposure
Along with some very small tonal adjustments:
Contrast: +6
Highlights: -6
Shadows: +6
Whites: -2
Blacks: -3
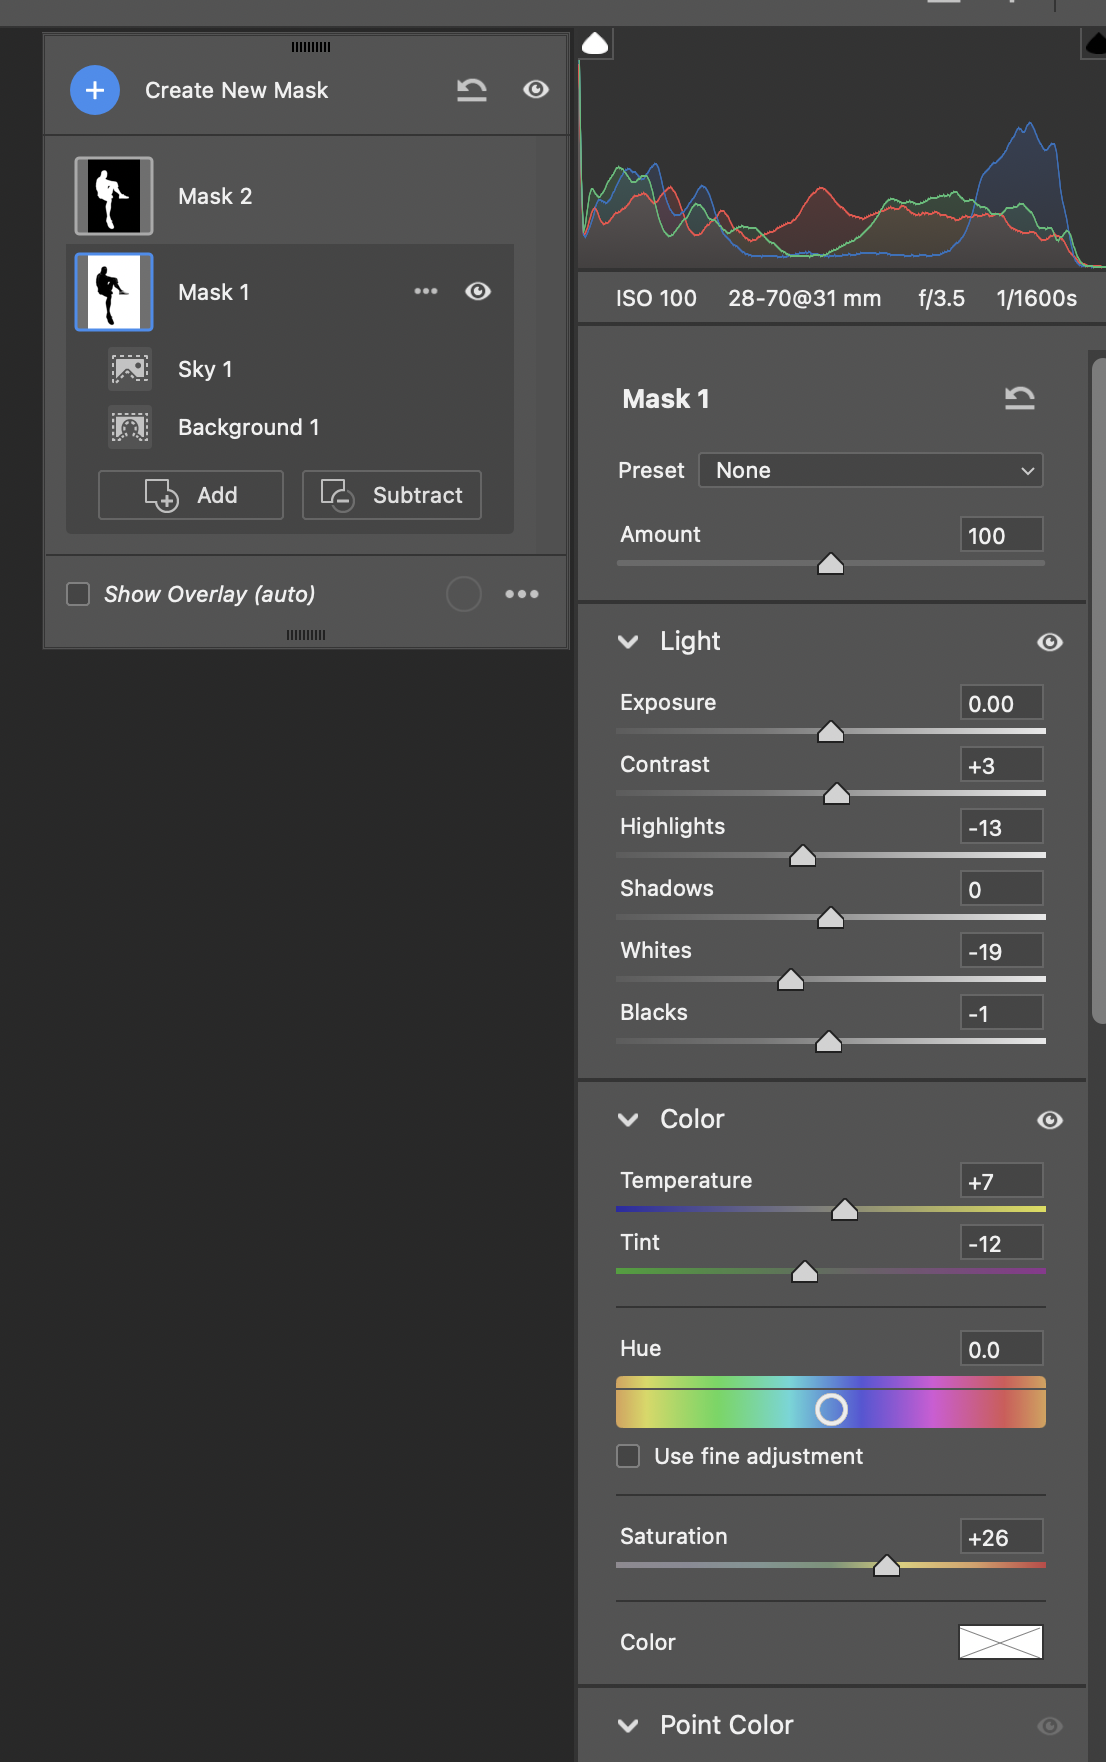
I think this is a valuable part of the lighting lesson. I wasn't trying to relight Phillip in Photoshop.
The FJ400 had already done that job on location.
The mask was refinement.
That's a distinction worth making.
If I find myself making massive exposure corrections to my subject afterward, I have to ask whether that was something I could have handled more effectively with my lighting when I captured the photograph.
Refining the Sky
The environment received more deliberate color finishing.
For the sky/background mask, I made relatively small tonal adjustments, including reducing the highlights and whites.
I also adjusted the color slightly and added approximately:
+26 saturation
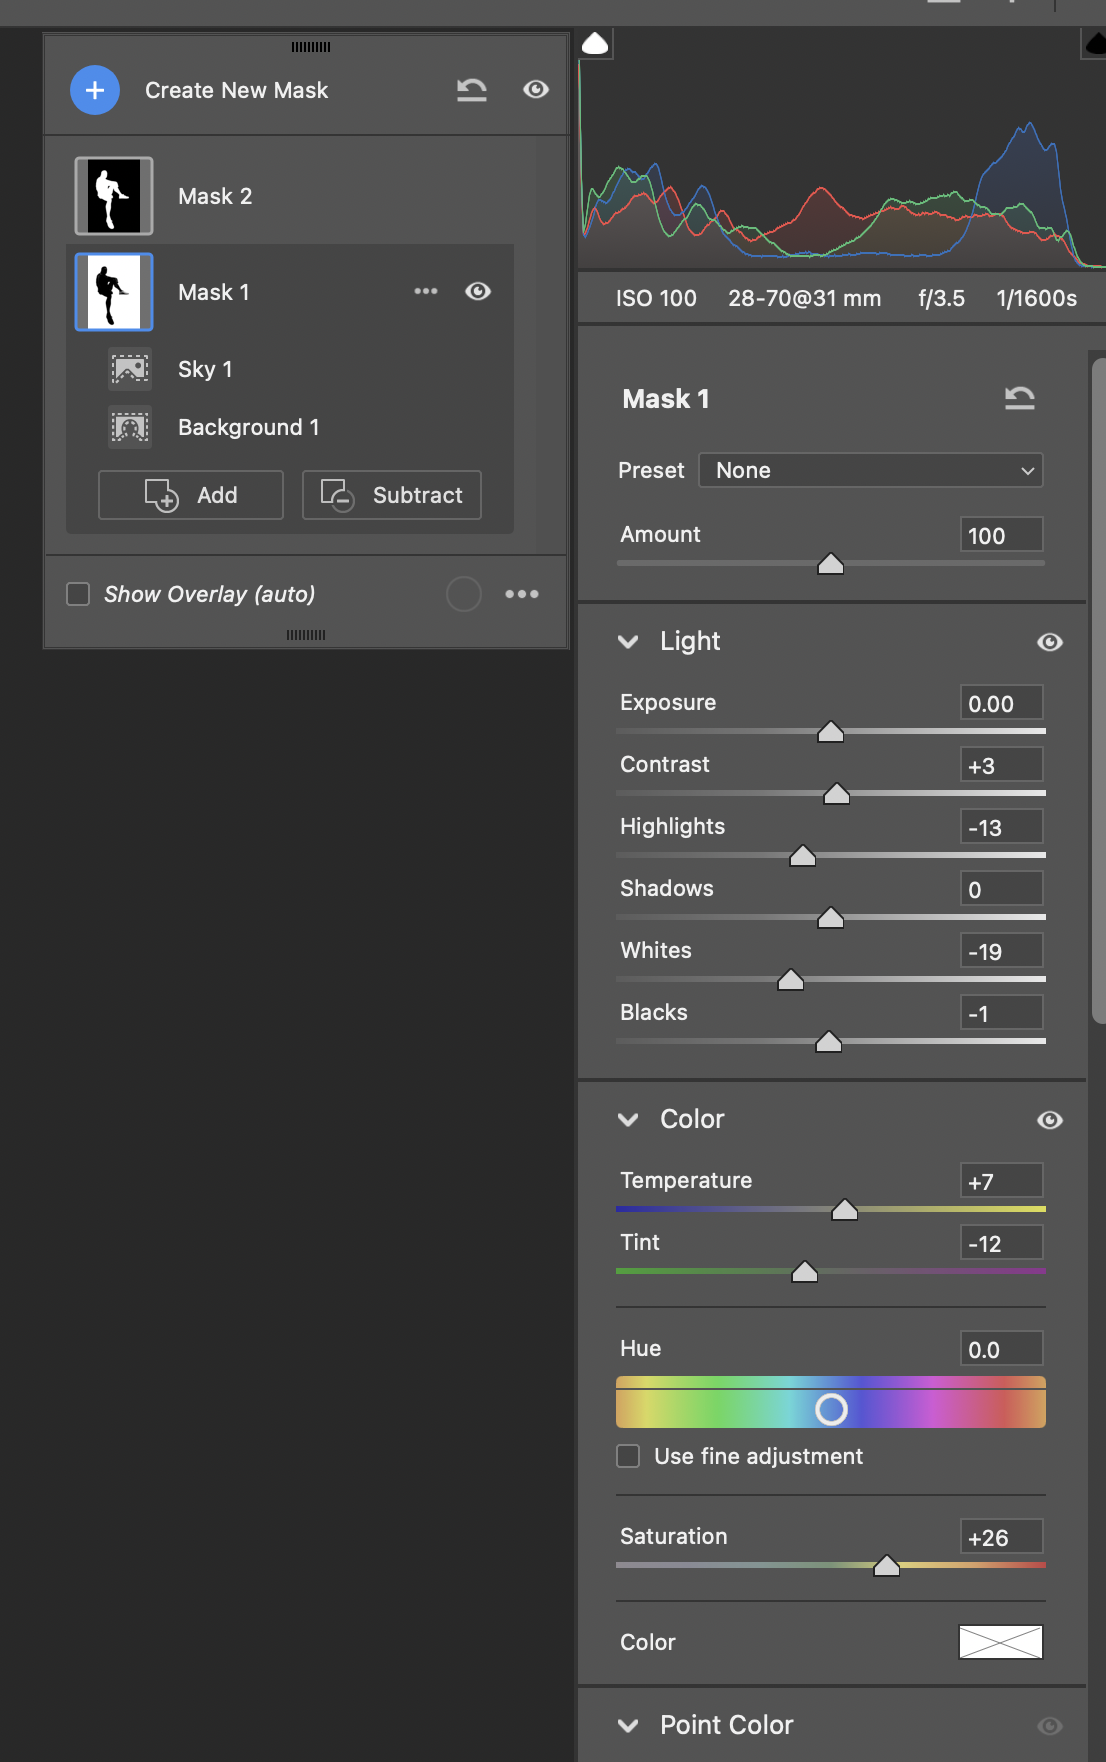
So yes, I enhanced the blue.
I don't want to pretend the RAW file came straight out of camera looking exactly like the finished photograph. But there's a difference between enhancing a color relationship that already exists and completely manufacturing one in post.
The blue hoodie was there.
The blue sky was there.
I saw the relationship before I pressed the shutter.
The lighting preserved it.
The RAW file gave me room to work.
And Photoshop allowed me to finish the idea.
The edit enhanced the idea. It didn't create the idea.
If You're Just Starting With Off-Camera Flash
If you're newer to photography and all the talk about HSS, TTL and flash compensation feels like a lot, don't get stuck on the numbers.
Simplify the entire process to four steps:
Look for color relationships. Pay attention to what your subject is wearing and find colors in the environment that work with it.
Expose the background first. Get your sky or environment looking the way you want it.
Add flash to your subject. Use the flash to solve the subject-exposure problem created when you exposed for the background.
Use what's already available. Before adding another flash, see if the sun or environment can do the job.
You don't need three or four lights to start creating photographs with depth.
You need to understand what each light is doing.
If You're More Advanced
If you've been using off-camera flash for a while, I think there's another layer to this photograph.
None of these technical decisions were made independently.
The 1/1600 sec shutter speed, HSS, ambient exposure, +1.3 TTL flash compensation, modifier placement, natural rim light and RAW processing were all serving one visual decision:
I wanted to preserve the color relationship I saw between Phillip and the environment.
As photographers become more technically proficient, it's easy for the conversation to become about what we're capable of doing.
I can add another light.
I can overpower the sun.
I can dramatically underexpose the background.
I can change the colors in Lightroom.
But the more important question is:
Does the photograph need it?
I could have lit Phillip more dramatically. I could have added multiple flashes. I could have pushed the blues considerably harder in post.
None of those things automatically make the portrait better.
The lighting needed to support the photograph—not become the photograph.
Gear & Settings
Subject: Phillip, Class of 2025
Camera: Canon EOS R5
Lens: Canon RF 28–70mm F2 L USM
Focal Length: 31mm
Exposure: ISO 100 · f/3.5 · 1/1600 sec
Flash: Westcott FJ400
Flash Mode: TTL + High-Speed Sync
Flash Exposure Compensation: +1.3
Modifier: Westcott Rapid Box Switch Octa-S
Light Position: Camera right, above Phillip
Additional Light: The sun
Capture Format: RAW
Location: Southwest Louisiana
Date & Time: February 24, 2025 · 5:02 PM
The Bigger Lesson: Train Your Eyes, Not Just Your Hands
Gear matters.
Technique matters.
Understanding HSS matters.
Learning flash-to-ambient balance matters.
But one of the biggest things photography education has given me is simply learning what to look for.
I didn't bring a blue background to this senior session. Phillip brought the blue hoodie. Nature brought the blue sky.
My job was to notice the relationship.
Then I used my camera, one FJ400, the sun and a little post-production to turn what I saw into the finished photograph. That's something photographers at every level can work on.
The more you train yourself to notice color, light, patterns and relationships in everyday environments, the less dependent you become on perfect locations or complicated lighting setups. Sometimes the photograph is already there. You just have to learn to see it.